Sunday, July 29, 2012

Retail Therapy @ J.Crew.. never fails!

Last time I posted, I was a little stressed about the demolition in the kitchen and the mess.. Unfortunately, things only got worse.. Thursday I started feeling under the weather, and Friday I was diagnosed witih strep throat and an ear infection!

Ahhhhhhhhhhhhhhhhhhhhhhhhhhhhhhhhhhhhhhhhhhhhhhhhhhhhhhhhhhhhhhhh!

After resting up for two solid and a half days, I decided to venture to the mall to get a smoothie (There is nothing like a chilly drink to soothe a sore throat!)  On the way, I ended up bopping into J.Crew for a few minutes and of course couldn't resist purchasing a few of their new, beautiful fall items! I ended up getting two scarves (dot) and the sweater below.


I am such a sucker for polka dots and leapord print! :) I was actually thrilled to see this polka dot sweater there in this color and in my size. I tried to order it online several days ago and it was sold out! SO, while shopping didn't cure my ailments or clean my kitchen, it DID lift my spirits :)

However, I have some good news about the kitchen floor demolition too... Will share soon!


Wednesday, July 25, 2012

Kitchen Floor Demo Ahhhhhh!!!

Ripping out the layers and layers and flooring in the kitchen (5 to be exact) is turning out to be absolutely grueling....

Now I think I understand why they just kept layering it on instead of ripping it up!

Granted if we would have done that, there would have been like a 5-inch difference between the floors in the kitchen and the floors in the dining room lol :) Tell me its worth it!


Definitely feeling the stress right now like I never have before in this project! :( Usually I'm one to enjoy the journey but right now I just want this to be OVER! Any words of comfort, motivation, and patience you can give would be much appreciated right now!


Tuesday, July 24, 2012

Floors and Faucets

We've officially ordered the tile for the mudroom...!! We ultimately decided to go with  12" x 24" Burma Negro tile from The Tile Shop.  It arrives on Thursday! (The piece below is just a sample I picked up.. have you ever been to the one of these stores? Best customer service ever! I also took their tiling class last Saturday.. so informative and so much fun! I highly recommend it if you have one of these shops in your area!)


I also recently got these beautiful faucets from Home Depot on clearance for $70 each! I was able to score one for each our of three bathrooms. It is the Glacier Bay Lyndhurst Faucet in Mediterrean Bronze. Love it! :)


Things are really starting to come together! I will share more pictures of projects soon.. We are making a ton of progress!

Wednesday, July 18, 2012

ONE more Parade of Homes :)

I have one last home to share.. I love the neutral colors and textures paired with the light blue :) I also thought the white moldings were amazing in this house! The pictures don't even do it justice!


Tuesday, July 17, 2012

Genevieve's Holiday Home (Yes, Holiday!)

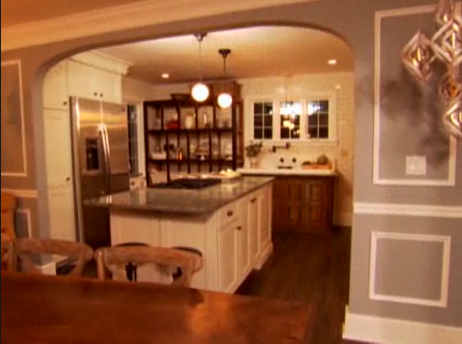
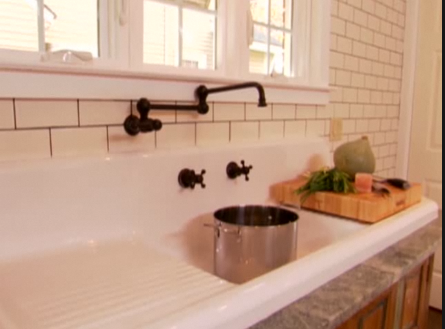
Genevieve Gorder is one of my favorite designers, and earlier this year (errr, late last year!) I was absolutely enchanted with HGTV's special "Genevieve's Holiday Home." Ok, ok, she may be a little annoying and I totally think she is MEAN as a judge on HGTV Design Star, but I love her designs. Right up my alley! And in this episode she designed an AWESOME kitchen. It is one I keep going back to in order to get ideas for our finished kitchen. I love the pendants, the barstools, the countertops, and the backsplash. Overall, I love that it is NEW but still has a vintage feel.

I wish I could have gotten better pictures, but this was the best I could do!


They also showed shots of Genevieve's own kitchen.. it's beautiful as well! 


Source of All Photos: HGTV

I also love the orange mixer :) I'm slightly embarrassed to admit it, but I'm kind of starting to get excited for fall!

Monday, July 16, 2012

Wisconsin!

We had the MOST wonderful vacation to Wisconsin this past week :)

We went to Madison, Devil's Lake, and Lake Delton.. it was beautiful, relaxing, and refreshing.

Most of all SO thankful about the time we got to spend with our family!


My favorite picture....


Wednesday, July 11, 2012

Painting: Lessons I've Learned from Mistakes I've Made

I've posted about my paint debacle before here, but I spent even more time this weekend repainting the walls I worked so hard to paint once already! This weekend, it was the entry's turn to go from a semi-gloss finish to a flat finish:


I also repainted the stairs. They just weren't WHITE enough! A lot of the ugly yellowish paint that was there originally was showing through, as was some of the stain from when we had the steps refinished. Basically it just needed a facelift. Here is an in-progress shot (After taping, before painting):


While I was repainting, I thought about how much more confident I am when painting and all of the lessons that I've learned. The most interesting thing I learned about being a good painter has nothing to do with skill or tricks-of-the-trade, but just about making sure I'm awake, focused, prepared, and up for the job! That being said, here are my painting tips:
  • Prep the night before you paint! This includes getting out your drop-cloth, brushes, paint cans, stir sticks, rollers, and painters tape the night before. I actually even prefer to tape everything the night before as well. This can take a really long time (for me, often longer than painting a coat!) so I try to break up the prep and the painting between days so I'm not tired before I even start with the paintbrush. If I'm tired, I am sloppy and careless!
  • Eat a solid snack or a good meal before painting. I find that if I get hungry an hour into painting a room, I start to get tired, I lose energy, and therefore, once again, I start to get sloppy! (I swear sleeping and eating are the good to a key paint job!)
  • About an hour into painting, stop and clean your brush and your hands. As you may have picked up on, I can be a little bit sloppy at times (!!), but, I also have surfaces I do NOT want to get paint on so I have to be careful. The best thing I have found to do this is to STOP and wash up every hour or so. This way my brush isn't dripping the excess paint that starts to accumulate near the base, and I'm not making handprints or elbow-prints across the walls with the paint that's gotten on my hands (or elbows)
  • And in case the above doesn't work... Always, ALWAYS, carry a wet-paper towel in one hand while painting. If you are messy as I am, this is essential to quickly wipe-up drops on your trim or beautiful floors! I've also found if you put just a dap of dishsoap on the papertowel too, it works even better.
  • Paint in natural light. You can see your strokes and lines so much more clearly and this often leads to a better paint job. I typically always try to paint first thing in the morning when my house is nice and bright! 
  • When painting with primer, as I often do, I try to wear long sleeves and pants, and sometimes even gloves. I use Killz primer whenever I have the need, and the stuff is great but its HARD to get off your skin! I have sensitive skin, and scrubbing endlessly to remove the paint is painful and time consuming!  I won't do it anymore - long sleeves it is!
  • Understand that painters tape is not God's gift to painters no matter how much those paint commercials try to sell it! It's a lie! It helps, but it is not perfect by any means and can be very frustrating if you are expecting amazing results.  The best way I've found to use it successfully not to go directly to the taped area right after you load your brush with paint. Paint in the middle wall of the first, and then when your brush is nearly dry, THEN go near the area that is taped. This will hopefully help you prevent excess paint from seeping through the tape.
    • I prefer the 1.5" Scotch Blue Delicate Surface tape with Edge Lock.
  • Always REMOVE any outlet covers or switchplates before painting. Do NOT tape over them or try to paint around them. The result is soo much better if you remove them, paint, and then put them back on. (Trust me, I know from experience!)
  • I buy a lot of Sherwin Williams paints.. Every once in awhile, they have a big paint sale where cans are 30% off. Even if I don't need paint that current moment, sometimes I'll buy a few gallons and stock up, and then bring them to be mixed later when I figure out what project (and color!) I need next! This way I take advantage of the sale but am not committed to a color yet!
  • For keeping track of your paint colors (especially custom mixes), I take a picture of the top of my cans that show that color mix. I keep it on my iPhone, this way I always have the 'recipe' for the color handy when I'm out and about!

  • Always apply two coats. Always!
  • If you can, remove your baseboards if you plan on painting the room and your baseboards at the same time. Having a real nice, clean line between the room and the trim makes the room look so much more crisp! I painted my baseboards without removing them, and the line isn't 100% perfect and to be honest it drives me a little crazy! (Hence the reason I plan on slowly replacing all the baseboards in my house!)
  • My favorite brush is a 2" angled brush with a short handle. It is my go-to for painting trim, for painting edges, for getting in tight corners, for painting furniture... the list goes on and on. I have about 10 of these and rarely ever use any other kind of brush! 
  • And my number one rule... If you have plaster walls, use a FLAT paint!!!!! (This will hide the blemishes and look a million times better!)
I think thats it! :) Any other tips to share? Especially regarding painting ceilings? That is next on my list!


Sunday, July 8, 2012

Closet Makeover: Complete!

My closet's been in MUCH need of a makeover! The walls were off-white, dirty, and beat up.  It was dreadful! 

Obviously I planned to paint my closet, but I didn't just want a fresh coat and call it a day. I wanted more than that... I wanted this space to INSPIRE me! The way I feel when I walk into J.Crew or Madewell or Nordstrom, when I see something on a hanger and dream of how I could wear it and where! 


Below is the lovely before picture. First, I dumped everything in my closet in the guest bedroom. Then, I primed the closet top to bottom (I used Killz primer, the stuff is incredible). Then, I painted the ceiling and walls the same color as my master bedroom - Martha Stewart's Flagstone.


I then went through every piece of clothing I owned and decided whether it was worth keeping or whether to donate to Goodwill. I got rid of three HUGE bags of clothes! It felt sooo good to purge and it excites me to know that is what is left in my closet are the clothes that fit will, are in good condition, and make me feel good when I wear them! (Seriously, should clothes that DON'T meet this criteria ever be an option?)

 Plus, this closet is obviously super small (one of the wonderful characteristics of a home built in the 1940s!) so freeing up the space and giving my clothes more breathing room on the racks also makes it feel much more like the "store" feel I was after.

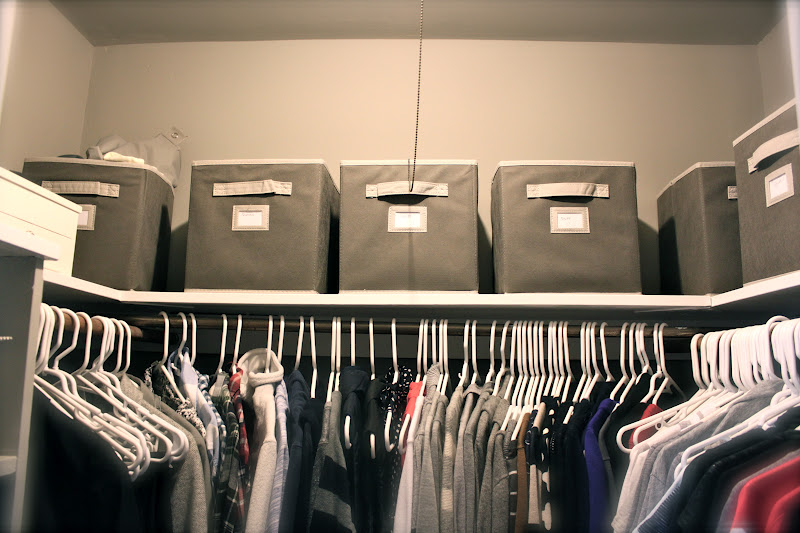
Next, I bought these amazing bins from the Martha Stewart line at Home Depot (Gosh, I love that line!) They were $7 bucks a pop and GREAT for storage. I've got one for scarves, one for swimsuits, one for painting clothes, one for contacts, and others for misc. items. I lovvvveee being organized.


The cubbies on the side of the closet are great for displaying my favorite bags and shoes.


Now, the entrance to my closet (between the master bedroom and master bath) and the closet feel like my own little (I emphasize the LITTLE!) boutique! :)  It may be a little change, but it will definitely make getting dressed in the morning a little more fun.


Unfortunately, it also inspired me to repaint all of the other closets in the house as well. I feel that having clean, freshly painted closets bring this house from feeling like the old house it is to feeling new and clean and crisp! You readers with new houses or apartments might think I'm crazy, but if you have an old house you'd understand how significant this is! I've already started into three more closets... Did I mention that most of these are wallpapered and super musty? The transformations are amazing. I'll post more pics soon :) 

 
01 09 10